Ideate
Senior Member
This is my Post Your Rack build. I like seeing people make shit, especially when it's local and made for bikes.
Item: DIY Bike rack
Location: My garage
Cost: Steel $8 + Bolts $20 + hooks $15 + lazy Saturday
Condition: raw and solid as
I wanted to get rid of the roof racks because I was damaging the paint (and I couldn't go through Maccas drive through). So I got a towbar installed and started looking around for a rack, mainly GripSport and ISI and cheap copies on CyclingDeal. I wasn't too interested in spending $500> on something so simple, nor was I interested in something so flimsy and cheap feeling (I went into CyclingDeal for a look).
So I found a bloke selling 40mm steel square tube for $8 a length (about 2.5m). Then went down to my local fab shop and asked for a scrap piece of 6mm plate (free). The rest I had lying around the garage, random bits of 25mm and 30mm square tube. So the steel cost me $8 all up but probably would have cost about $20 if I had to buy those other small pieces. Also wasn't sure about how I'd secure the frame and wheels so I bought pre-made garage hooks from Bunnings for $5 each so actually the materials would have cost about $35.
I wasn't 100% on how it was going to work but I drew out a few ideas and measured things as I went. Picture time.
So before we start, I tried to make do with what tools I already had so there's a few hacky things going on here (I think I got it from my late Grandfather, he was such a resourceful man).
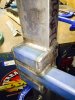
First problem was.. how the hell am I going to drill a hole big enough for the towball?


A few holes later and some filing...

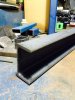
This scrap piece was a perfect fit so that was kind lucky that my local fabrication shop had this piece lying around.

Cut into the 40mm square tube. Not sure I needed to go four but I wanted this to be solid and I was thinking forward to a swing down design (I'll explain later down).

Making some measurements as I went. I actually sent Grip a PM asking if he would sell me just his base plate that connected to the towball. But he didn't reply. Obviously not worth the time or money.

All the main bits cut to length with holes put in for bolts.

So the idea was.. I'll be able to undo the top bolts to swivel the rack down to open the boot of the car.

On the car.. doing a few more measurements and visualising how it's going to work.

Time to weld those suckers onto the base plate. I love welding shit but I'm pretty rubbish at it. I think it's more to do with my equipment though :ranger:

This was one of my better passes. Besides the splatter, I get great satisfaction out of a nice clean weld.

Cut the 40mm tube ends off on an angle to make it square with the ground.

Testing to make sure the horizontal piece will fit and be square(ish).

Prepared this piece before welding it on. Drilled and tapped some holes to fix the number plate.

Welded on the horizontal holding pieces. I put both 30mm and 40mm on there so I could slide either 25mm or 35mm through as horizontal bars. Also might want to add an extension one day so wanted it to be flexible.

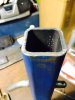
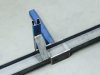
Here's the hooks from Bunnings, that I cut in half then welded to small pieces of 35mm square tube to slide over the horizontal bar.

Making sure it fits my wheels.

Even fits my T-1 20" wheels (just).

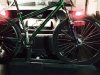
Very first fit with the missus's bike. Just checking measurements and the wheel holders.

Last main job was to weld on the vertical, swingy support bar.

There's the 95% finished rack. Used another one of those Bunnings hooks, just like the wheel holders, to pull the bike down from the top tube.


All adjustable and very solid.

Cleaned up the horizontal bar and drilled some holes in it's front to secure it with the number plate bolts.

Added a strap for a fail safe incase my allen key tighteners come loose.

I put this in the hack thread.. but this was basically made to deter people unbolting the entire rack from the tongue (bolts to the towbar assembly, no hitch receiver).

Drilled a hole through the towball so I could padlock that on as well.

Next I have to decide whether I want to weld those pieces above on instead of being bolted through the main base plate. I'm still thinking about making it so you can unclip the top two bolts so you can swivel the whole rack down to the floor and have easy access to the boot but I don't think I'll ever use it considering I can reach everything in the boot from the back doors.
All I've got left is to make two more bike wheel holders but Bunnings sold out of the wall hook things so I'm thinking about alternative ways to do this (and retain it's adjustability).
I hope this has been entertaining for some of you with my dogdey hack welds and ideas. Happy riding!
Tail lights update on page 3...

Item: DIY Bike rack
Location: My garage
Cost: Steel $8 + Bolts $20 + hooks $15 + lazy Saturday
Condition: raw and solid as
I wanted to get rid of the roof racks because I was damaging the paint (and I couldn't go through Maccas drive through). So I got a towbar installed and started looking around for a rack, mainly GripSport and ISI and cheap copies on CyclingDeal. I wasn't too interested in spending $500> on something so simple, nor was I interested in something so flimsy and cheap feeling (I went into CyclingDeal for a look).
So I found a bloke selling 40mm steel square tube for $8 a length (about 2.5m). Then went down to my local fab shop and asked for a scrap piece of 6mm plate (free). The rest I had lying around the garage, random bits of 25mm and 30mm square tube. So the steel cost me $8 all up but probably would have cost about $20 if I had to buy those other small pieces. Also wasn't sure about how I'd secure the frame and wheels so I bought pre-made garage hooks from Bunnings for $5 each so actually the materials would have cost about $35.
I wasn't 100% on how it was going to work but I drew out a few ideas and measured things as I went. Picture time.
So before we start, I tried to make do with what tools I already had so there's a few hacky things going on here (I think I got it from my late Grandfather, he was such a resourceful man).
First problem was.. how the hell am I going to drill a hole big enough for the towball?
A few holes later and some filing...
This scrap piece was a perfect fit so that was kind lucky that my local fabrication shop had this piece lying around.
Cut into the 40mm square tube. Not sure I needed to go four but I wanted this to be solid and I was thinking forward to a swing down design (I'll explain later down).
Making some measurements as I went. I actually sent Grip a PM asking if he would sell me just his base plate that connected to the towball. But he didn't reply. Obviously not worth the time or money.
All the main bits cut to length with holes put in for bolts.
So the idea was.. I'll be able to undo the top bolts to swivel the rack down to open the boot of the car.
On the car.. doing a few more measurements and visualising how it's going to work.
Time to weld those suckers onto the base plate. I love welding shit but I'm pretty rubbish at it. I think it's more to do with my equipment though :ranger:
This was one of my better passes. Besides the splatter, I get great satisfaction out of a nice clean weld.
Cut the 40mm tube ends off on an angle to make it square with the ground.
Testing to make sure the horizontal piece will fit and be square(ish).
Prepared this piece before welding it on. Drilled and tapped some holes to fix the number plate.
Welded on the horizontal holding pieces. I put both 30mm and 40mm on there so I could slide either 25mm or 35mm through as horizontal bars. Also might want to add an extension one day so wanted it to be flexible.
Here's the hooks from Bunnings, that I cut in half then welded to small pieces of 35mm square tube to slide over the horizontal bar.
Making sure it fits my wheels.
Even fits my T-1 20" wheels (just).
Very first fit with the missus's bike. Just checking measurements and the wheel holders.
Last main job was to weld on the vertical, swingy support bar.
There's the 95% finished rack. Used another one of those Bunnings hooks, just like the wheel holders, to pull the bike down from the top tube.
All adjustable and very solid.
Cleaned up the horizontal bar and drilled some holes in it's front to secure it with the number plate bolts.
Added a strap for a fail safe incase my allen key tighteners come loose.
I put this in the hack thread.. but this was basically made to deter people unbolting the entire rack from the tongue (bolts to the towbar assembly, no hitch receiver).
Drilled a hole through the towball so I could padlock that on as well.
Next I have to decide whether I want to weld those pieces above on instead of being bolted through the main base plate. I'm still thinking about making it so you can unclip the top two bolts so you can swivel the whole rack down to the floor and have easy access to the boot but I don't think I'll ever use it considering I can reach everything in the boot from the back doors.
All I've got left is to make two more bike wheel holders but Bunnings sold out of the wall hook things so I'm thinking about alternative ways to do this (and retain it's adjustability).
I hope this has been entertaining for some of you with my dogdey hack welds and ideas. Happy riding!
Tail lights update on page 3...
Last edited:
")