Welcome to the next exciting review on products provided to us by our friends at Mountain Bikes Direct. We've teamed up with one of Australia's best online mountain bike stores to bring you in depth reviews on the latest and most intriguing parts and accessories you can purchase for your bike.
The values shared by the staff at Rotorburn and Mountain Bikes Direct are the same; we have a huge passion for mountain biking! It's our pleasure to be in a great position to test, review and share our in depth details on some great products available from Mountain Bikes Direct.
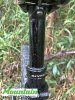
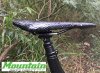
Item: Bikeyoke Revive dropper post
Purchased From: Mountain Bikes Direct (Click here for the product page)
Purchase Price (approx): $459 for the 30.9 diameter post with 160mm travel using the triggy remote
Usage: All mountain / enduro and trail riding
Pros – Extremely good feel when operating the raise and lower function of the dropper. Easy to fit and very reliable using a housed cable instead of hydraulic lines to the remote. It also comes in a huge range of options for sizing and remote options.
Cons – So far, none. I have not seen the post available as an external cable though.
Product outline: A common thing in all mountain and endure riding is a dropper post. It enables a rider to have the benefit of the saddle in the best position for climbing and JRA (just riding along) then moves the post down to take it out of the way for descending and tackling obstacles. A dropper post turns a good bike into a great bike and eliminates any variable that may arise from having a saddle height that is too high or too low on any ride.
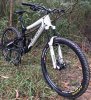
Bike used: Norco Sight Carbon with Cane Creek Inline Coil rear shock, Rockshox Pike dual position forks, tubeless wheel set with aggressive tyres, 12 speed SRAM Eagle drivetrain, SRAM Guide brakes, Raceface components and Bikeyoke Revive dropper post
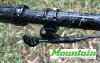
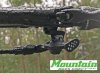
Fitting: First up, this is an internally routed dropper. That means the hose is connected to the bottom of the post and needs to be fed through your frame to an exit point allowing it to connect to your handlebar trigger to operate the drop and raise function. As disclosed earlier, it is cable actuated, not a hydraulic line as seen on a lot of other dropper posts. This is very important to note as it effectively eliminates any issues caused with air in the hydraulic circuit and reduces the need for extra specific tools to fit and adjust the dropper.
Fitting is a breeze! You’ve already determined which type of bar mounted remote you need. In my case, I’ve got the triggy remote so I can mount it under the handlebar and attach it to my SRAM matchmaker to keep the cockpit area super tidy. The manual supplied does give you a broad outline of fitting the post but some mechanical sense will make this thing a total walk in the park. As it is cable actuated, just mount your remote where you want it then feed the cable housing through your frame so you can determine the correct length to cut the housing. The manual doesn’t tell you this but do not cut the housing before you route the cable! Once the outer is fed the frame (typically that is the hardest job on any bike related job) you run the bare end of the cable into the housing. Hot tip time! Like you would when you chuck a near gear cable in, run some cable magic lube down the cable so it improves the cable movement in the housing, I swear by that stuff. Let the cable then run all the way out and then you’re ready to determine the length of the outer cable.
This part is important, make sure you get this right You now have the inner fed through the cable housing. Pull the inner tight so the cable end block sits firmly in the triggy. Slide your cable outer up to the housing of the triggy and establish what length the outer needs to be at the front of your bike. Turn the bars so ensure it’ll clear the top tube in the event that your bars are spun around so it doesn’t snap the cable. Now, I suggest sticking a piece of tape to the outer where it enters the frame so you know where to set it for the next step.
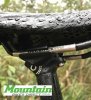
Next, you need to get the post sorted. Again, refer to the manual for this process if need be but it’s pretty simple AND the seat post itself has a diagram on it showing you how to cut the cable to the exact length! It’s great! So, you now have the desired placement of the cable and outer at the front of the bike, you now need to sit your post next to the frame to figure out how far down the post will be inserted into the frame. For me, using a 160mm drop means the post is almost all the way in; I left about an inch of the post exposed above the seat post clamp and below the collar. Grab that extra bit of tape you had and wrap it around the cable outer at the point it exits the frame then pull the cable outer through your frame so it exposes the point where you cut it. To make that cut, just measure the distance from where your seat post will be outside the frame when inserted and to the small tip on the bottom of the post where the cable outer with the cable cap will sit just inside the machined cable housing mount.
Slide the inner cable far enough back into the outer so you can cut the outer cable to length. Make the cut then slide your inner back through so it is tight again and slide the outer tip on nice and snug. My advice is to wind the adjuster barrel on the triggy so the cable is at its longest length, this will enable you to tighten the cable once it is cut to length.
Now this is where you use the measurement on the seat post itself to get the right length for the cable. Understand that the cable outer will sit a few millimetres inside the housing to keep it in place and to operate as some leverage for the dropper mechanism. Measure the length the inner cable needs to be to allow you to mount the small fitting that locates the cable end in the dropper mechanism then add a few extra millimetres of cable in case you need that minute adjustment. Cut the cable, screw the fitting onto the cable then locate into the dropper mechanism and set the cable outer in its recessed housing. You now push the post into your frame and pull the cable back through from the front to take up the slack used to make the cuts outside your frame. Bolt you seat bolt collar up and bam! You’re ready to set the post up for its final adjustment and test.
If the triggy feels a little slack, just adjust the barrel to tighten it. It should make the lever firm from the start of the action. There is a process in the manual to follow for the first drop and it is the first time you’ll use the AMAZING reset function. It’s easy, just grab the provided allen key to fit the reset bolt under the saddle on the side of the clamp, open it up and push the post down while operating the triggy. Tighten the reset bolt before you release the triggy and then release the triggy. Thats it, you’re done! Operate the triggy remote and post a few times and you’re away.
On the trail: I’ve wanted a new dropper post for a while. I was running a Reverb with 125mm drop and it always felt as though I had to compromise between having the post just not low enough and just not high enough. I thought I’d grab a 150mm dropper but the Bikeyoke Revive caught my eye on it’s incredible functionality with a 160mm drop. First ride impressions were amazing, it feels so solid, doesn’t have the awful key way wobble that some posts have and feels so directly straight and down. Being a longer drop than the 125mm I was using, I had to make a few stops to adjust the height I ran the post in the frame but only by a handful of millimetres. It did take a little getting used to when dropping the post all the way down as it travelled that much further but geez, it’s down and out of the way when you need it. Coming back out onto a flat section which eventually turns into an uphill climb, I found I was putting the post up but not to it’s full 160mm, it felt a little more comfortable being maybe 15mm from the very top of its travel on the causal stuff on the trail. When it came to the climb, I nudged the triggy just to get that extra leg extension and was seated perfectly for the five minute techy grind up some singletrack. Once at the peak and onto some flat again, I dropped it just a little.
The important thing to note there is not once did I have the bob when operating the post. I hit the triggy, the thing feels firm and direct and the post stops on a dime as soon as I get off the triggy. There’s no bouncing on the post, there’s no wobble, there’s no nothing. It feels like a rigid bolted in post every time I’m on it. Thats a big thing to note as I’m a bigger dude and tend to get the bob more than some. With the Bikeyoke, no bob.
Summary: I’ve owned several other dropper posts and have ridden many bikes with brands fitted that I haven’t owned. Not one of them has felt that much different to the other except for the old school droppers with the lever under the seat, they were horrible! The Bikeyoke is easily, by far the best post I have ever run and works so damn well. Why is that way? It sells itself on the function of the tricky bits inside the post. We’ve all come to expect some sag in a dropper post when the seals leak and / or some air gets into the system. The only way around that is new seals and a fresh bleed. With the Revive, it eliminates the need for that stuff with the reset function that we used when finishing the setup of the post. What does it do? It allows you to reset the operation of the internals of the post if a small amount of air is in the system. Simply drop the post, turn the reset bolt while it’s down and thats the air gone. Do the reset bolt up then raise the post and you are on your way.
As the post is new, I have not got any long term input. I will update this review with long term results but after a few weeks of riding it, I’m very impressed and can wholeheartedly justify what may seem like a bit too much money for a dropper post. It is that good, it is the best post I’ve used and I wish I’d found it sooner as I almost reckon the other posts I’ve used have been rubbish compared to this.
The values shared by the staff at Rotorburn and Mountain Bikes Direct are the same; we have a huge passion for mountain biking! It's our pleasure to be in a great position to test, review and share our in depth details on some great products available from Mountain Bikes Direct.
Item: Bikeyoke Revive dropper post
Purchased From: Mountain Bikes Direct (Click here for the product page)
Purchase Price (approx): $459 for the 30.9 diameter post with 160mm travel using the triggy remote
Usage: All mountain / enduro and trail riding
Pros – Extremely good feel when operating the raise and lower function of the dropper. Easy to fit and very reliable using a housed cable instead of hydraulic lines to the remote. It also comes in a huge range of options for sizing and remote options.
Cons – So far, none. I have not seen the post available as an external cable though.
Product outline: A common thing in all mountain and endure riding is a dropper post. It enables a rider to have the benefit of the saddle in the best position for climbing and JRA (just riding along) then moves the post down to take it out of the way for descending and tackling obstacles. A dropper post turns a good bike into a great bike and eliminates any variable that may arise from having a saddle height that is too high or too low on any ride.
Bike used: Norco Sight Carbon with Cane Creek Inline Coil rear shock, Rockshox Pike dual position forks, tubeless wheel set with aggressive tyres, 12 speed SRAM Eagle drivetrain, SRAM Guide brakes, Raceface components and Bikeyoke Revive dropper post
Fitting: First up, this is an internally routed dropper. That means the hose is connected to the bottom of the post and needs to be fed through your frame to an exit point allowing it to connect to your handlebar trigger to operate the drop and raise function. As disclosed earlier, it is cable actuated, not a hydraulic line as seen on a lot of other dropper posts. This is very important to note as it effectively eliminates any issues caused with air in the hydraulic circuit and reduces the need for extra specific tools to fit and adjust the dropper.
Fitting is a breeze! You’ve already determined which type of bar mounted remote you need. In my case, I’ve got the triggy remote so I can mount it under the handlebar and attach it to my SRAM matchmaker to keep the cockpit area super tidy. The manual supplied does give you a broad outline of fitting the post but some mechanical sense will make this thing a total walk in the park. As it is cable actuated, just mount your remote where you want it then feed the cable housing through your frame so you can determine the correct length to cut the housing. The manual doesn’t tell you this but do not cut the housing before you route the cable! Once the outer is fed the frame (typically that is the hardest job on any bike related job) you run the bare end of the cable into the housing. Hot tip time! Like you would when you chuck a near gear cable in, run some cable magic lube down the cable so it improves the cable movement in the housing, I swear by that stuff. Let the cable then run all the way out and then you’re ready to determine the length of the outer cable.
This part is important, make sure you get this right You now have the inner fed through the cable housing. Pull the inner tight so the cable end block sits firmly in the triggy. Slide your cable outer up to the housing of the triggy and establish what length the outer needs to be at the front of your bike. Turn the bars so ensure it’ll clear the top tube in the event that your bars are spun around so it doesn’t snap the cable. Now, I suggest sticking a piece of tape to the outer where it enters the frame so you know where to set it for the next step.
Next, you need to get the post sorted. Again, refer to the manual for this process if need be but it’s pretty simple AND the seat post itself has a diagram on it showing you how to cut the cable to the exact length! It’s great! So, you now have the desired placement of the cable and outer at the front of the bike, you now need to sit your post next to the frame to figure out how far down the post will be inserted into the frame. For me, using a 160mm drop means the post is almost all the way in; I left about an inch of the post exposed above the seat post clamp and below the collar. Grab that extra bit of tape you had and wrap it around the cable outer at the point it exits the frame then pull the cable outer through your frame so it exposes the point where you cut it. To make that cut, just measure the distance from where your seat post will be outside the frame when inserted and to the small tip on the bottom of the post where the cable outer with the cable cap will sit just inside the machined cable housing mount.
Slide the inner cable far enough back into the outer so you can cut the outer cable to length. Make the cut then slide your inner back through so it is tight again and slide the outer tip on nice and snug. My advice is to wind the adjuster barrel on the triggy so the cable is at its longest length, this will enable you to tighten the cable once it is cut to length.
Now this is where you use the measurement on the seat post itself to get the right length for the cable. Understand that the cable outer will sit a few millimetres inside the housing to keep it in place and to operate as some leverage for the dropper mechanism. Measure the length the inner cable needs to be to allow you to mount the small fitting that locates the cable end in the dropper mechanism then add a few extra millimetres of cable in case you need that minute adjustment. Cut the cable, screw the fitting onto the cable then locate into the dropper mechanism and set the cable outer in its recessed housing. You now push the post into your frame and pull the cable back through from the front to take up the slack used to make the cuts outside your frame. Bolt you seat bolt collar up and bam! You’re ready to set the post up for its final adjustment and test.
If the triggy feels a little slack, just adjust the barrel to tighten it. It should make the lever firm from the start of the action. There is a process in the manual to follow for the first drop and it is the first time you’ll use the AMAZING reset function. It’s easy, just grab the provided allen key to fit the reset bolt under the saddle on the side of the clamp, open it up and push the post down while operating the triggy. Tighten the reset bolt before you release the triggy and then release the triggy. Thats it, you’re done! Operate the triggy remote and post a few times and you’re away.
On the trail: I’ve wanted a new dropper post for a while. I was running a Reverb with 125mm drop and it always felt as though I had to compromise between having the post just not low enough and just not high enough. I thought I’d grab a 150mm dropper but the Bikeyoke Revive caught my eye on it’s incredible functionality with a 160mm drop. First ride impressions were amazing, it feels so solid, doesn’t have the awful key way wobble that some posts have and feels so directly straight and down. Being a longer drop than the 125mm I was using, I had to make a few stops to adjust the height I ran the post in the frame but only by a handful of millimetres. It did take a little getting used to when dropping the post all the way down as it travelled that much further but geez, it’s down and out of the way when you need it. Coming back out onto a flat section which eventually turns into an uphill climb, I found I was putting the post up but not to it’s full 160mm, it felt a little more comfortable being maybe 15mm from the very top of its travel on the causal stuff on the trail. When it came to the climb, I nudged the triggy just to get that extra leg extension and was seated perfectly for the five minute techy grind up some singletrack. Once at the peak and onto some flat again, I dropped it just a little.
The important thing to note there is not once did I have the bob when operating the post. I hit the triggy, the thing feels firm and direct and the post stops on a dime as soon as I get off the triggy. There’s no bouncing on the post, there’s no wobble, there’s no nothing. It feels like a rigid bolted in post every time I’m on it. Thats a big thing to note as I’m a bigger dude and tend to get the bob more than some. With the Bikeyoke, no bob.
Summary: I’ve owned several other dropper posts and have ridden many bikes with brands fitted that I haven’t owned. Not one of them has felt that much different to the other except for the old school droppers with the lever under the seat, they were horrible! The Bikeyoke is easily, by far the best post I have ever run and works so damn well. Why is that way? It sells itself on the function of the tricky bits inside the post. We’ve all come to expect some sag in a dropper post when the seals leak and / or some air gets into the system. The only way around that is new seals and a fresh bleed. With the Revive, it eliminates the need for that stuff with the reset function that we used when finishing the setup of the post. What does it do? It allows you to reset the operation of the internals of the post if a small amount of air is in the system. Simply drop the post, turn the reset bolt while it’s down and thats the air gone. Do the reset bolt up then raise the post and you are on your way.
As the post is new, I have not got any long term input. I will update this review with long term results but after a few weeks of riding it, I’m very impressed and can wholeheartedly justify what may seem like a bit too much money for a dropper post. It is that good, it is the best post I’ve used and I wish I’d found it sooner as I almost reckon the other posts I’ve used have been rubbish compared to this.
Attachments
-
 445.5 KB Views: 502
 -
 385.9 KB Views: 505
 -
 426.9 KB Views: 487
 -
 427.5 KB Views: 496
 -
 477.4 KB Views: 496
 -
 616.1 KB Views: 503
 -
 238.8 KB Views: 193
 -
 168.4 KB Views: 202
 -
 108.8 KB Views: 197
 -
 110.4 KB Views: 196
 -
 217.8 KB Views: 181
 -
 116.8 KB Views: 190
Last edited:
")