Since changing the travel questions on the DJ series are pretty common, i thought it would be good to have a thread which peoplle can look at, and search , and answer all thier questions.
Juls wrote up a really good guide that can really be applied to servicing and modfying all forks. I did a bit of tinkerinng today and lowered the travel of some DJ 3's, taking some photos along the way,
So with Juls Written instructions and some photos to match i think most peoples qustions would be answered and no need for threads every couple of weeks asking for the same thing.
Juls's written instructions (Very good, follow it and you should haave no probs):
You'll need to strip the whole fork down,
basically.
1. let the air out of the fork
2. undo the top caps
3. compress the fork, take the springs out
4. turn the fork upside down, tip all the oil out, pump the fork up and down alot until all the oil is out (either put it in cups, the garden whatever, try not to get it all over your bike and yourself
5. with the bike still upside down, there is a nut on the bottom of the legs. Undo those, they might turn around and around, you'll have to put something inside the fork to stop the pistons turning around again. (you can also just slightly loosen these while the fork is still together, the spring preload might be enough to stop the pistons turning supposing you have this problem anyway)
6. once you get the leg bolts undone, (supposing your disk brake has been taken off the fork) you can slide the legs off, be careful not to damage the seals.
7. now you can see both the pistons on the end of the fork. You the end stoppers can be undone, they usually just press fit, sometimes they are threaded. once you get these undone, the pistons will drop out of the fork..
8. now you have the plungers/pistons in your hand, they should have a spring up close to the top of the piston, and then under it a 20mm plastic spacer (like a piece of PVC Pipe) well.. take out that plastic spacer. then just put it all back together.
9. once the 20mm spacers are off the pistons, drop the piston with it's spring ect on it back into the stanchions. Put the stopper ends back on.
10. Take the lowers, remove the springs from the wipers, put them one each leg.
11. VERY carefully put the lowers back on, you have to be VERY careful here, if you are too rough you will damage the seals, and they will weap, Marzocchi claim you cannot take the lowers off without replacing the seals, this is BS, you can do it without damaging them. you just have to be careful.
12. once you get the legs back on, put the nuts back on the bottom of the fork, you might need to put a object inside the stanchion to push the plungers upwards so you can get the bolts on, and hold them while you do them up.
13. turn the bike up the right way.. now you can put the required amount of oil in the fork from the marzocchi websites oil levels table (www.marzocchi.com) 7.5wt is standard, 10wt is good for heavier riders.
you can get Fork oil from the motobike shop, forget the bike shop they will rip you off.
14. As you put in the oil, you will have to pump the fork slowly to get the air out, keep pumping till it doesn't squelch anymore from trapped air and you have all the oil required in the fork.
15. put the new 130mm springs back in the fork.
16. extend the fork out to top out and put the top caps back on the fork.
17. repreload the fork if it needs it.. (normally not)
18. Put the cover caps back on, refit your disk brakes.. and RIDE!
Also make sure that you clean every little part so that all bits of metal, pllastic and paint are gone, and regrease all o rings + Seals (mentioned above) upon reassembly.
So Here are some photos in order to go with the Instructions above:
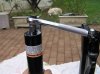
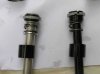
1) Picture off an $8 socket set with a 12mm socket to fit footbolt.
2)Undoing Footbolt
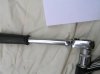
3)Undoing Topcap 21mm socket i think
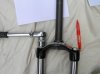
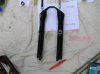
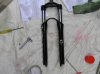
4)Forkss dissasembled, showing rods as well
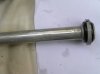
5)Lowers
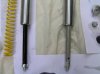
6)CLose up of the dampning rods
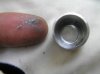
7)Rods out of the fork with plastic spacer below thte little spring.
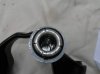
8)Top of the LHS rod you can see how damage occurs, bits of metal fractued off the end, when you have the forks apart look for things like this, try and isolate and identify problems.
9)You can see why regular oil changes are neccesary, to prevent stuff like metal on metal contact, you can see how it is wearing
10)Clean out crap like this metal paste.
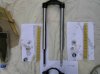
11)The final product DJ3's at 110mm travel. Raising the travel is the opposoite, no new parts are needed for this procedure.
Good luck rebuilding your forks!!
Juls wrote up a really good guide that can really be applied to servicing and modfying all forks. I did a bit of tinkerinng today and lowered the travel of some DJ 3's, taking some photos along the way,
So with Juls Written instructions and some photos to match i think most peoples qustions would be answered and no need for threads every couple of weeks asking for the same thing.
Juls's written instructions (Very good, follow it and you should haave no probs):
You'll need to strip the whole fork down,
basically.
1. let the air out of the fork
2. undo the top caps
3. compress the fork, take the springs out
4. turn the fork upside down, tip all the oil out, pump the fork up and down alot until all the oil is out (either put it in cups, the garden whatever, try not to get it all over your bike and yourself
5. with the bike still upside down, there is a nut on the bottom of the legs. Undo those, they might turn around and around, you'll have to put something inside the fork to stop the pistons turning around again. (you can also just slightly loosen these while the fork is still together, the spring preload might be enough to stop the pistons turning supposing you have this problem anyway)
6. once you get the leg bolts undone, (supposing your disk brake has been taken off the fork) you can slide the legs off, be careful not to damage the seals.
7. now you can see both the pistons on the end of the fork. You the end stoppers can be undone, they usually just press fit, sometimes they are threaded. once you get these undone, the pistons will drop out of the fork..
8. now you have the plungers/pistons in your hand, they should have a spring up close to the top of the piston, and then under it a 20mm plastic spacer (like a piece of PVC Pipe) well.. take out that plastic spacer. then just put it all back together.
9. once the 20mm spacers are off the pistons, drop the piston with it's spring ect on it back into the stanchions. Put the stopper ends back on.
10. Take the lowers, remove the springs from the wipers, put them one each leg.
11. VERY carefully put the lowers back on, you have to be VERY careful here, if you are too rough you will damage the seals, and they will weap, Marzocchi claim you cannot take the lowers off without replacing the seals, this is BS, you can do it without damaging them. you just have to be careful.
12. once you get the legs back on, put the nuts back on the bottom of the fork, you might need to put a object inside the stanchion to push the plungers upwards so you can get the bolts on, and hold them while you do them up.
13. turn the bike up the right way.. now you can put the required amount of oil in the fork from the marzocchi websites oil levels table (www.marzocchi.com) 7.5wt is standard, 10wt is good for heavier riders.
you can get Fork oil from the motobike shop, forget the bike shop they will rip you off.
14. As you put in the oil, you will have to pump the fork slowly to get the air out, keep pumping till it doesn't squelch anymore from trapped air and you have all the oil required in the fork.
15. put the new 130mm springs back in the fork.
16. extend the fork out to top out and put the top caps back on the fork.
17. repreload the fork if it needs it.. (normally not)
18. Put the cover caps back on, refit your disk brakes.. and RIDE!
Also make sure that you clean every little part so that all bits of metal, pllastic and paint are gone, and regrease all o rings + Seals (mentioned above) upon reassembly.
So Here are some photos in order to go with the Instructions above:
1) Picture off an $8 socket set with a 12mm socket to fit footbolt.
2)Undoing Footbolt
3)Undoing Topcap 21mm socket i think
4)Forkss dissasembled, showing rods as well
5)Lowers
6)CLose up of the dampning rods
7)Rods out of the fork with plastic spacer below thte little spring.
8)Top of the LHS rod you can see how damage occurs, bits of metal fractued off the end, when you have the forks apart look for things like this, try and isolate and identify problems.
9)You can see why regular oil changes are neccesary, to prevent stuff like metal on metal contact, you can see how it is wearing
10)Clean out crap like this metal paste.
11)The final product DJ3's at 110mm travel. Raising the travel is the opposoite, no new parts are needed for this procedure.
Good luck rebuilding your forks!!
Attachments
-
 44.9 KB Views: 825
 -
 52.9 KB Views: 1,287
 -
 32.8 KB Views: 845
 -
 35.3 KB Views: 2,374
 -
 43.1 KB Views: 1,176
 -
 40.2 KB Views: 882
 -
 36.8 KB Views: 1,219
 -
 33.1 KB Views: 1,359
 -
 32.5 KB Views: 921
 -
 32.4 KB Views: 881
 -
 32.9 KB Views: 874
 -
 43.9 KB Views: 829
