Welcome to the next exciting review on products provided to us by our friends at Mountain Bikes Direct. We've teamed up with one of Australia's best online mountain bike stores to bring you in depth reviews on the latest and most intriguing parts and accessories you can purchase for your bike.
The values shared by the staff at Rotorburn and Mountain Bikes Direct are the same; we have a huge passion for mountain biking! It's our pleasure to be in a great position to test, review and share our in depth details on some great products available from Mountain Bikes Direct.

Item: Huck Norris anti flat tubeless protection for mountain bike wheelsets
Purchased From: Mountain Bikes Direct (Click here for the product page)
Purchase Price (approx): Starting at $46.95 for one wheel, a two wheel set is $85.95 plus postage
Usage: Mountain biking
Product outline: Huck Norris anti flat tubeless protection is intended to provide additional protection to your tubeless wheels and tyres to prevent pinch flats and does it in such an easy method by providing a foam insert that creates a pillow of sorts between your rim edge and tyre when your tyre sidewall is compressed.
Pros: Very light, very easy to install, very effective at preventing flats, makes it easier to inflate a tubeless tyre with a floor pump, buying the two wheel pair comes with packaging that doubles as a mudguard!
Cons: Absorbs tyre sealant.
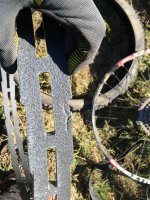
Fitting: First up, ensure you order the correct width Huck Norris to suit your rims and tyres. I've installed Huck Norris on a 27.5" wheelset with a Stans Flow EX rim that is 30mm wide internally. The guideline for ordering Huck Norris is to get the one that is wider than your rim measurement so in this case I ordered the large size to suit rims 34mm to 45mm. I ordered the set too, it comes with two pieces of Huck Norris to do a front and rear wheel. It's important to note that you need to trim the length to size and it comes to suit anything up to a 29" wheel so no need to look for something that suits a smaller or larger wheel.
Fitting was totally a breeze. My method was simple. I unpackagaed the Huck Norris, let them sit on the ground to unfold and sucked the existing sealant out of my wheels using the Stans syringe. I then popped the tyre off the bead on one side, gave it a quick wipe inside with a clean towel and grabbed my first piece of Huck Norris. The idea of it is to sit between your beaded tyre where it meets the rim face and the underside (inside) of the tyre tread so when you roll over something sharp edged (a rock) or land hard (huck to flat) your tyre will not be damaged by the rim edge because there's a fancy piece of Huck Norris between the two surfaces.
With that in mind, you simply roll the Huck Norris around the outside edge of your rim and locate the first spot that will indicate where to cut the material. Hold up folks! The old saying of "measure twice, cut once" comes out in force here, make sure you leave enough play in the Huck Norris that it isn't too tight on the rim edge! Once you're sure that you're on the right spot, you mark the line you want to cut off with a sharp blade then double check it. You need to make sure you keep one of the joining tabs that run across the pattern of the material as this surface will butt up again the other end of the Huck Norris.
Now, cut it cleanly so the short side edge will sit flush against the opposing end, just to be sure it will sit snug. You then roll the other end so it is against the piece you just cut and you wrap the provided velcro strap around the two ends. I suggest using some clamps here, I have clamped the two ends together then put the velcro on to ensure it sits firmly, OCD maybe?")
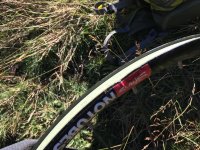
This is the point where you can sit the Huck Norris inside your tyre and above your rim edge. You'll see just how well this setup works at this point and you'll understand why the correct measurement is crucial. It should just slide straight inside your tyre and not drop inside your rim edge and lean over the rim edge below the seated tyre surface on the other side.
Right then, this is where you can insert your tyre bead into the rim and seat your tyre. Pay some attention to where the Huck Norris thick edge sits as you seat the tyre as it seems like it can roll to one side and not be in the exact middle of the width of the tyre. You'll notice it should be pushing your tyre sidewall out and making it easier for your tyre to seat. Once the tyre was on, I rolled the wheel along the ground with a deflated tyre and made sure I could feel the Huck Norris between the underside of the tread and the rim edge, that way I knew it was in the right spot and it was actually super easy to line it all up. You'll get the best feel and impression for what Huck Norris is all about at this point too, you'll feel that magic cushion between your tyre and rim edge and your confidence should grow!
The next step is to put your sealant in. I use the Stans syringe that feeds the sealant in through the removed valve core but you can just put your scoops in before you bead your tyre if you don't do the core method. My advice though? Get a valve core removal tool, grab a sealant syringe and never spill another drop of sealant on Nan's rug again. I tend to put around 120ml of sealant in but this time around I put about 160ml as the Huck Norris suggests it soaks it up a little as it has more surface to cover, makes sense.
Now is the point where you can test the theory that Huck Norris makes it easier to inflat a tubeless tyre with a floor pump. Science says it should too, the material pushes your tyre bead into the rim and should just seat itself............and it does! It was a breeze to inflate from zero pressure to 40 PSI and the bead seated itself at about 20PSI. To my liking was the fact that it was a brand new tyre too.
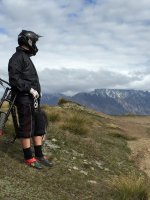
On the trail: My timing with Huck Norris was planned. I installed it a week before I was due to fly out to sunny Queenstown in New Zealand and shred the beautiful loam, the round edged roots and the square edged rocks of the surrounding mountains. I've spent many a summer in New Zealand and have never come home without flatting tyres on trail bikes, enduro bikes and downhill bikes both tubeless and tubed. I was so confident in the science of Huck Norris that I knew I could rely on it to prevent flats. Did it work? Yep! Not one flat, only typical PSI deflation of around 3 to 5 PSI a day, no burping, no loss of sealant and no holes. Did I actually man up and try to pop a tyre on a flat landing? Did I line up every root or hard edged rock and totally smash into it? Well, yeah I did but those that have ridden the hills around Queenstown know that you can't avoid them anyway and your only option is to smash into it all!
You know that dreaded ping sound when you hammer into a hard rock? I have forgotten that sound since putting Huck Norris in my tyres, not a sound! Surprisingly though, the anti flat protection isn't the only upside I found to Huck Norris. read on.............
Huck Norris has totally changed my tyre feel. It has eliminated a shitload of sidewall roll and firmed the tyre tread surface up so my grip is more predictable than ever. Having that tubeless feel with a horizontal stiffener inside the tyre has made my ride feel really stable both in cornering and braking. I don't tend to run lower pressures purely as I like some extra feel in my tyre but Huck Norris has allowed me to tinker a little with what I'm used to and broadened my view on what can be achieved with performance on your bike through some squishy bits.
I did not notice any extra rotational weight, I didn't feel heavier on some of the 1000m vertical climbs and by the second day I was totally confident that I could go that little bit harder into some features knowing this material would hold the wind in my tyres.
Summary: Is it just a gimmick like a Power Balance Band? Did some Astrology guru dream it up and is making millions from it? I dunno about the latter but can assure you that if you have ever had a tubeless flat then Huch Norris is a deadset savior to your existence. It's cheap, it's so effective, it's so easy to install, it's simple technology that just works. You can ask yourself "Yeah righto, you didn't get a flat so how do you know it works?"..................I have gotten heaps of flats but with Huck Norris I have had not one issue with anything relating to tyres. It works for me and I'll be putting it in each wheelset I have on my rides. Honestly, I cannot see a downside to it.


The values shared by the staff at Rotorburn and Mountain Bikes Direct are the same; we have a huge passion for mountain biking! It's our pleasure to be in a great position to test, review and share our in depth details on some great products available from Mountain Bikes Direct.
Item: Huck Norris anti flat tubeless protection for mountain bike wheelsets
Purchased From: Mountain Bikes Direct (Click here for the product page)
Purchase Price (approx): Starting at $46.95 for one wheel, a two wheel set is $85.95 plus postage
Usage: Mountain biking
Product outline: Huck Norris anti flat tubeless protection is intended to provide additional protection to your tubeless wheels and tyres to prevent pinch flats and does it in such an easy method by providing a foam insert that creates a pillow of sorts between your rim edge and tyre when your tyre sidewall is compressed.
Pros: Very light, very easy to install, very effective at preventing flats, makes it easier to inflate a tubeless tyre with a floor pump, buying the two wheel pair comes with packaging that doubles as a mudguard!
Cons: Absorbs tyre sealant.
Fitting: First up, ensure you order the correct width Huck Norris to suit your rims and tyres. I've installed Huck Norris on a 27.5" wheelset with a Stans Flow EX rim that is 30mm wide internally. The guideline for ordering Huck Norris is to get the one that is wider than your rim measurement so in this case I ordered the large size to suit rims 34mm to 45mm. I ordered the set too, it comes with two pieces of Huck Norris to do a front and rear wheel. It's important to note that you need to trim the length to size and it comes to suit anything up to a 29" wheel so no need to look for something that suits a smaller or larger wheel.
Fitting was totally a breeze. My method was simple. I unpackagaed the Huck Norris, let them sit on the ground to unfold and sucked the existing sealant out of my wheels using the Stans syringe. I then popped the tyre off the bead on one side, gave it a quick wipe inside with a clean towel and grabbed my first piece of Huck Norris. The idea of it is to sit between your beaded tyre where it meets the rim face and the underside (inside) of the tyre tread so when you roll over something sharp edged (a rock) or land hard (huck to flat) your tyre will not be damaged by the rim edge because there's a fancy piece of Huck Norris between the two surfaces.
With that in mind, you simply roll the Huck Norris around the outside edge of your rim and locate the first spot that will indicate where to cut the material. Hold up folks! The old saying of "measure twice, cut once" comes out in force here, make sure you leave enough play in the Huck Norris that it isn't too tight on the rim edge! Once you're sure that you're on the right spot, you mark the line you want to cut off with a sharp blade then double check it. You need to make sure you keep one of the joining tabs that run across the pattern of the material as this surface will butt up again the other end of the Huck Norris.
Now, cut it cleanly so the short side edge will sit flush against the opposing end, just to be sure it will sit snug. You then roll the other end so it is against the piece you just cut and you wrap the provided velcro strap around the two ends. I suggest using some clamps here, I have clamped the two ends together then put the velcro on to ensure it sits firmly, OCD maybe?
This is the point where you can sit the Huck Norris inside your tyre and above your rim edge. You'll see just how well this setup works at this point and you'll understand why the correct measurement is crucial. It should just slide straight inside your tyre and not drop inside your rim edge and lean over the rim edge below the seated tyre surface on the other side.
Right then, this is where you can insert your tyre bead into the rim and seat your tyre. Pay some attention to where the Huck Norris thick edge sits as you seat the tyre as it seems like it can roll to one side and not be in the exact middle of the width of the tyre. You'll notice it should be pushing your tyre sidewall out and making it easier for your tyre to seat. Once the tyre was on, I rolled the wheel along the ground with a deflated tyre and made sure I could feel the Huck Norris between the underside of the tread and the rim edge, that way I knew it was in the right spot and it was actually super easy to line it all up. You'll get the best feel and impression for what Huck Norris is all about at this point too, you'll feel that magic cushion between your tyre and rim edge and your confidence should grow!
The next step is to put your sealant in. I use the Stans syringe that feeds the sealant in through the removed valve core but you can just put your scoops in before you bead your tyre if you don't do the core method. My advice though? Get a valve core removal tool, grab a sealant syringe and never spill another drop of sealant on Nan's rug again.
I tend to put around 120ml of sealant in but this time around I put about 160ml as the Huck Norris suggests it soaks it up a little as it has more surface to cover, makes sense.Now is the point where you can test the theory that Huck Norris makes it easier to inflat a tubeless tyre with a floor pump. Science says it should too, the material pushes your tyre bead into the rim and should just seat itself............and it does! It was a breeze to inflate from zero pressure to 40 PSI and the bead seated itself at about 20PSI. To my liking was the fact that it was a brand new tyre too.
On the trail: My timing with Huck Norris was planned. I installed it a week before I was due to fly out to sunny Queenstown in New Zealand and shred the beautiful loam, the round edged roots and the square edged rocks of the surrounding mountains. I've spent many a summer in New Zealand and have never come home without flatting tyres on trail bikes, enduro bikes and downhill bikes both tubeless and tubed. I was so confident in the science of Huck Norris that I knew I could rely on it to prevent flats. Did it work? Yep! Not one flat, only typical PSI deflation of around 3 to 5 PSI a day, no burping, no loss of sealant and no holes. Did I actually man up and try to pop a tyre on a flat landing? Did I line up every root or hard edged rock and totally smash into it? Well, yeah I did but those that have ridden the hills around Queenstown know that you can't avoid them anyway and your only option is to smash into it all!
You know that dreaded ping sound when you hammer into a hard rock? I have forgotten that sound since putting Huck Norris in my tyres, not a sound! Surprisingly though, the anti flat protection isn't the only upside I found to Huck Norris. read on.............
Huck Norris has totally changed my tyre feel. It has eliminated a shitload of sidewall roll and firmed the tyre tread surface up so my grip is more predictable than ever. Having that tubeless feel with a horizontal stiffener inside the tyre has made my ride feel really stable both in cornering and braking. I don't tend to run lower pressures purely as I like some extra feel in my tyre but Huck Norris has allowed me to tinker a little with what I'm used to and broadened my view on what can be achieved with performance on your bike through some squishy bits.
I did not notice any extra rotational weight, I didn't feel heavier on some of the 1000m vertical climbs and by the second day I was totally confident that I could go that little bit harder into some features knowing this material would hold the wind in my tyres.
Summary: Is it just a gimmick like a Power Balance Band? Did some Astrology guru dream it up and is making millions from it? I dunno about the latter but can assure you that if you have ever had a tubeless flat then Huch Norris is a deadset savior to your existence. It's cheap, it's so effective, it's so easy to install, it's simple technology that just works. You can ask yourself "Yeah righto, you didn't get a flat so how do you know it works?"..................I have gotten heaps of flats but with Huck Norris I have had not one issue with anything relating to tyres. It works for me and I'll be putting it in each wheelset I have on my rides. Honestly, I cannot see a downside to it.
Last edited: