Needle in the eye (needle bearing shock eyelet bushings)

Scotty T

Walks the walk
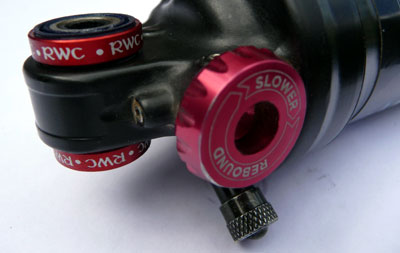
I've been looking at the RWC and the DIY MTB ones. Looks like the RWC are the Chris King of these eyelet bearings, at more than double the cost of the DIY.

First question is what do I run in my 22mm width linkage? Bronson 2015 specs say 22mm but these only come in 21.9 or 22.2. I'll ask before I buy, just wanted to see if anyone here knows.

Who is running either and what are your thoughts?

Looking at the differences RWC has fancy covers, and three included diameters of inner ring to get a super precision fit once the outer shell has been pressed in and compressed (or not) slightly. Otherwise they do the same thing.

I'm thinking for my purposes I'm not needing the precision Chris King level, Dia-Compe has always done me just fine for 25 years :) I also like to support local, which DIY are.

Anyone in Canberry got the DIY tool that they would lend me or assist to remove/install in my bike for a couple of beers? I don't mind buying one but it won't get used much at all.
 

Nambra

Definitely should have gone to specsavers
SC shock mounts take the 21.85mm RWC needle bearings AFAIK (and others on Yankee forums). Someone on here has the tool and was putting it for loan recently.

Keen to hear how you get on and from others, as it's an upgrade I'm considering too. If you decide on the RWC perhaps we could split postage?
 

rowdy71

Squid
hi

i bought one from DIY MTB for the top eyelet of my shock about 18 months ago. for a cheap upgrade it makes a big difference. it brings so much more small bump compliance (you may need to increase your rebound a click or two, i did).
as far as sizing, i phoned DIY MTB office and they were spot on with the size i needed for my merida 140. id give them a call before you order.
i didnt have the tool either so i dropped into my LBS where they replaced it for $10. easy.

hope this helped
 

Flow-Rider

Burner
I'd be careful what you buy because the different tolerances on the crush of the shock eye diameter will require different shaft sizes. The RWC ones come with 3 machined inner shafts so that you don't get a knock in the shaft or the bearing ends up too tight. They also sell shims for the outside of the shaft length.
 

shmity

Likes Bikes and Dirt
I have bought both the DIY and the RWC units. The RWC come with more/better seals for the bearings, and as noted a range of shaft sizes to make sure you get a tight fit. The bearing itself is identical, it's just the extras that come with it. Check the thread on MTBR hardware spacing, I'm sure someones covered it over there.
 

Scotty T

Walks the walk
Cool thanks fellas who've used them. If any other Canberra peeps aside from @Nambra want to go in on some RWC ones they sound like the go. Assuming I could remove/install with the DIY tool?
 

Flow-Rider

Burner
Not a job I would give to a Ninja apprentice but If you're really careful you can leave the plastic spacer that they come with inside the bearing and tap them in with a small socket and rubber mallet, that's all I done and mine are fine. Just make sure you support the flat part of the eye and not on the round part of the shock shaft or air can.
 

goobags

Likes Dirt
I have the tool and it’s up for lending. I had the RWC bearings in my Lappy but have since sold it. Internet told me the lesser quality ones are prone to developing play early in their lift so that’s why I got the RWC ones. Pretty sure I needed the biggest of the 3 inner races to keep play to a minimum.


Sent from my iPhone using Tapatalk
 

SummitFever

Eats Squid
I'm still running the RWC needle bearing in my Anthem top shock mount about 8 years on. Had some issues with it initially as it was one of the first sets produced by RWC. They subsequently came out with the multiple inner races to fix the issue. The RWC version is expensive but it has basically outlasted 3 shocks on the Anthem. Highly recommended for longevity (although on the Anthem I can't say I noticed a great deal of difference in suspension performance).


As for the tool, I just used some suitably sized sockets:


More info here
 

tkdbboy

Likes Dirt
Bit of a tangent but I went from regular metal bushes to polymer DU bushes. Compared to the metal ones, they have way less friction , much easier to work with when changing hardware, doesn't mark your hardware and apparently lasts longer (haven't had mine long enough to confirm).

Pretty good bang for buck option. About $4 each.

Needle roller would take the cake for least friction. Would be keen to try it but I don't think I'd personally notice a difference.


Flow-Rider

Burner
Those RWC bearing kits cost a lot of money because the inner sleeves are precision ground, I've had mine for over 3 years and moved it from one bike to another. I've also had the shock modified internally to be a bit firmer and noticed the difference with the bearings.


350623
 

shmity

Likes Bikes and Dirt
Bit of a tangent but I went from regular metal bushes to polymer DU bushes. Compared to the metal ones, they have way less friction , much easier to work with when changing hardware, doesn't mark your hardware and apparently lasts longer (haven't had mine long enough to confirm).

Pretty good bang for buck option. About $4 each.

Needle roller would take the cake for least friction. Would be keen to try it but I don't think I'd personally notice a difference.

It very much depends on your bike, if the shock doesn't experience a large amount of rotation around an eyelet then the needle bearing won't be much benefit. Polymers are easy, if you're happy with them stick with them.
 

Scotty T

Walks the walk
Back story in case you didn't see in Confessions thread, my top pivot axle became loose because previous owner built/had it installed with no Loctite, and I think that play has stuffed the stock DU, there's no clunk when riding but there definitely some play in it now and you can clunk it side to side by hand.

I'm going to order some tomorrow (payday!). I probably have the appropriate bits to do it with the vice too, but I do like knowing that it can't really go wrong with a proper tool.
 

ctguru

Likes Bikes and Dirt
Defiantly dependant on needle bearing quality

I’ve been running the RWC kit and it has worked well. Last bearing I put in was shit and got lots of play after no time. Just replaced it and we will see how long it lasts now


Sent from my iPhone using Tapatalk
 

Scotty T

Walks the walk
Canberra heads hit me up, about to order one of these and it's $23 AUD shipping for a single unit so if anyone wants to go in on splitting shipping let me know today, have PM'd @Nambra.
 

Scotty T

Walks the walk
I never enjoy doing things I've never done the first time, but there's always something to learn so here's my run down of installing this sweet bit of kit.

First, read these instructions very carefully, right through before you start, and again as you do it. I only read it as I went, and needed to re read things to get it right.


For the tool, I bought a bolt, it was way too long, but I needed the bolt before I installed the bearing, and didn't look properly at how much room and thread I needed so I got an extra big one with full thread. Better than cutting down 1m of rod I suppose.

When you put the tool on the shock make sure the writing is facing you so the notch in the tool faces backwards and sits evenly where some shocks have a small step on the eyelet. When you wind it in, you might go too far like I did and have to push it back the other way a little. I think I might have misaligned it the first time which allowed it to push through further. The instructions are a bit vague, I will send them an email to see if they can add something about making sure the writing is facing the end of the shock eyelet. "Orient the tools as shown" didn't at first click with me that the writing was meant to be at the front, and I didn't realise the notches were for that, I thought they had something to do with the handles you can buy to attach. There is some writing on one side of the bearing, it looks a little like damage unless you look very closely, with reading glasses in my case. The little plastic sleeve in the bearing takes a bit of persuasion, I managed with my fingernail but a knife would be the go, something to be aware of as you wouldn't want to try and pull it out and have the bearing go flying.

The +1 size inner sleeve fitted mine, I started with the 0, which felt OK, but then I read the instruction more carefully and it said start big and go down. At one point one of the rollers caught the edge of one of the sleeves and popped out to the side but didn't fall out all the way so just re positioned and all good.

Remember which way your shock goes and don't put it in upside down is my only other advice. I was in a rush because I had to get dinner on and put the thing in, went and made dinner, came back to check sag and realised.

I'll go for a little spin this arvo and see how it is, feels super solid and the play is completely gone, starts into the sag easier, it had a bit of noticeable stiction before.
 

Scotty T

Walks the walk
Yeah just do it. Rode a steady pace from home and around the bottom of Stromlo. Sag was running a few percent more.

First thing I noticed was a smoothness over small stuff, the shock was working over everything. My experience was exaggerated I'm sure with a damaged bush before.

Second thing was a much less harsh stroke over bumps under 30cm while seated, it was previously bucking a bit more off the back of those. It felt overall just really nice sitting down pedalling.
 
Top