mike-
Likes Bikes and Dirt
Had a few happy people when I did abit of a How to on bleeding the brakes, thought I may aswell give it ago for this.
Now I'm sure people might disagree with this, blah blah different stanchions and I did it wrong, but I'm sure some people will be happy.
This will work for Boxxer Races, Teams, and converts them too the same intnerals as Boxxer World Cups.
Now before you attemp this, PLEASE read, study, worship, completely understand the Boxxer Service Manual that can we downloaded from the Sram website.
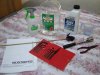
What you will need:
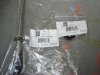
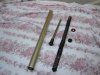
-Boxxer WC solo air spring ASSY (Part # 114311492000)
-Boxxer WC solo air top cap (Part # 114311493000)
-Fork Oil (I used 5wt)
-Grease (I used slick honey)
-24mm socket
-Thin Nosed Pliers
-4 and 5mm allen keys
-Metho, lots of it
-Rag on a stick


How to do it:
1.
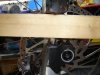
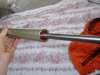
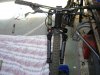
First of all, you need your left hand stanchion out of the fork (you can actuall leave the motion control (right hand side) one in to do this).
Firstly undo the bolt on the bottom of the leg 2 turns. Then put a bit of wood on it then give it a whack with a hammer. Hit it so the bolts sits flush again. Then completely remove the bolt (Oil will drain out the bottom leg at this point, be careful, mess is bad).
Now loosen all the bolts in the crowns holding the stanchion in place. Then give the stanchion a pull, it should come straight out.


2.
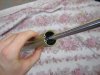
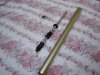
OK now we need to pull apart the internals of the stanchion. First undo the top cap with the 24mm socket (bit of a hint is to just loosen this slightly when the stanchion is still locked into the crowns).
Once the top cap is off, push the rod from the bottom of the stanchion, and this will push the spring out of the stanchion.
Once the spring is out, turn the leg upside down and let the rod fall through aswell.
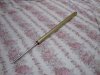
Next you need to remove the C-clip on the bottom of the leg. Can be abit of a bitch to do, just use the nose of the pliers. There are a couple of washers that will now come out too.
You should be left with just the stanchion.


3.
Cleaning.
Get the metho, clean all the grease/oil out of the leg. Make sure it's perfectly cleen. Then get your rag on a stick and give it an extra clean out.
Then clean it again to make sure.
(NB. This is the point that some people polish the inside of their stanchion, I plan to get WC stanchion's soonly).

4.
Next we need to put the new air cartridge into the fork.
But first, get your grease and coat all of the O-rings. I pretty much covered the whole cartridge.
The new air cartridge goes into the bottom of the stanchion. Just slide it in and put the bottom plastic stopped thingy (yes very technical) into the groove it sits in.
Lastly put the new C-clip back into the stanchion, holding the air cartridge in place.


5.
Next I put a few mL of 5wt fork oil into the top of the stanchion.
I also completely cleaned out the lowers, and put some oil into the lowers.
6.
Time to put the stanchion back onto the bike.
Just slide it down the crowns the same way it came out.
Just be careful not to get the edges of the fork seals folded in.
Once the stanchion in the whole way in, screw the bolt back into the rod.
Set your crowns at the right height, then tighten all the bolts again.
7.
Grease the threads of the top of the stanchion. With the 24mm socket screw in the new top cap.
Go get your shock pump, and fill that bloody huge hair chamber (it's abit of an effort if you pump doesnt have a low pressure setting or whatever it's called).
And we should be done.
Now I'm sure people might disagree with this, blah blah different stanchions and I did it wrong, but I'm sure some people will be happy.
This will work for Boxxer Races, Teams, and converts them too the same intnerals as Boxxer World Cups.
Now before you attemp this, PLEASE read, study, worship, completely understand the Boxxer Service Manual that can we downloaded from the Sram website.
What you will need:
-Boxxer WC solo air spring ASSY (Part # 114311492000)
-Boxxer WC solo air top cap (Part # 114311493000)
-Fork Oil (I used 5wt)
-Grease (I used slick honey)
-24mm socket
-Thin Nosed Pliers
-4 and 5mm allen keys
-Metho, lots of it
-Rag on a stick
How to do it:
1.
First of all, you need your left hand stanchion out of the fork (you can actuall leave the motion control (right hand side) one in to do this).
Firstly undo the bolt on the bottom of the leg 2 turns. Then put a bit of wood on it then give it a whack with a hammer. Hit it so the bolts sits flush again. Then completely remove the bolt (Oil will drain out the bottom leg at this point, be careful, mess is bad).
Now loosen all the bolts in the crowns holding the stanchion in place. Then give the stanchion a pull, it should come straight out.
2.
OK now we need to pull apart the internals of the stanchion. First undo the top cap with the 24mm socket (bit of a hint is to just loosen this slightly when the stanchion is still locked into the crowns).
Once the top cap is off, push the rod from the bottom of the stanchion, and this will push the spring out of the stanchion.
Once the spring is out, turn the leg upside down and let the rod fall through aswell.
Next you need to remove the C-clip on the bottom of the leg. Can be abit of a bitch to do, just use the nose of the pliers. There are a couple of washers that will now come out too.
You should be left with just the stanchion.
3.
Cleaning.
Get the metho, clean all the grease/oil out of the leg. Make sure it's perfectly cleen. Then get your rag on a stick and give it an extra clean out.
Then clean it again to make sure.
(NB. This is the point that some people polish the inside of their stanchion, I plan to get WC stanchion's soonly).
4.
Next we need to put the new air cartridge into the fork.
But first, get your grease and coat all of the O-rings. I pretty much covered the whole cartridge.
The new air cartridge goes into the bottom of the stanchion. Just slide it in and put the bottom plastic stopped thingy (yes very technical) into the groove it sits in.
Lastly put the new C-clip back into the stanchion, holding the air cartridge in place.
5.
Next I put a few mL of 5wt fork oil into the top of the stanchion.
I also completely cleaned out the lowers, and put some oil into the lowers.
6.
Time to put the stanchion back onto the bike.
Just slide it down the crowns the same way it came out.
Just be careful not to get the edges of the fork seals folded in.
Once the stanchion in the whole way in, screw the bolt back into the rod.
Set your crowns at the right height, then tighten all the bolts again.
7.
Grease the threads of the top of the stanchion. With the 24mm socket screw in the new top cap.
Go get your shock pump, and fill that bloody huge hair chamber (it's abit of an effort if you pump doesnt have a low pressure setting or whatever it's called).
And we should be done.
Attachments
-
 230.6 KB Views: 956
 -
 255.1 KB Views: 942
 -
 202.8 KB Views: 842
 -
 267.8 KB Views: 859
 -
 198.7 KB Views: 861
 -
 268.7 KB Views: 869
 -
 221.7 KB Views: 875
 -
 192.1 KB Views: 898
 -
 258.1 KB Views: 899
 -
 261.8 KB Views: 937
Last edited: