Adjustable Seat Posts

Nerf Herder

Wheel size expert
Al I didn't know you cared that much. ..........:kiss:
See people that's how you run a business. .......
more seriously ... I haven't heard plans of an offset LEV ... I know there is now an offset Internal offering called the CRUXi ... I haven't seen these yet, but its been described to me as an internal routed Dropzone. We've ordered a few due March ...

Pricing is in the $340rrp range ... could that work for you Grant ?
 

Matty_moo85

Likes Bikes
hey guys
Just got a new bike with a KS Lev Integra and the remote is not springing back. I had a look in the instruction manual and it talks about a barrel adjuster. I have had a good look and I cant seem to find a barrel adjuster on the "noodle". Is it going to be just the case of loosing the cable at the remote and trying to get some tension on it and tightening it back up again?
 

Dales Cannon

lightbrain about 4pm
Staff member
Obvious question, outer is sitting properly? Post up a pic; the LEV on my Bronson has an adjustable section next to the noodle. Sounds like too much tension on the cable, needs a bee's dick of slack.
 

JTmofo

XC Enthusiast
If your running 1x10 with a right shifter only, convert your left lever to use with your cable operated dropper ie KS / Thompson / X-fusion
Otherwise, a right hand lever on the reverb works well on the left side as it sits under the bar instead of over the bar.
KS use a grip lock on clamp which is tidy, once you use a 90 degs cable bend and route your cable with care.
 

Nerf Herder

Wheel size expert
hey guys
Just got a new bike with a KS Lev Integra and the remote is not springing back. I had a look in the instruction manual and it talks about a barrel adjuster. I have had a good look and I cant seem to find a barrel adjuster on the "noodle". Is it going to be just the case of loosing the cable at the remote and trying to get some tension on it and tightening it back up again?
What Dale said ... Other things to look at.
i) if you are running as an ODI clamp ... Look at trimming back the grip flanges just a little. Sometimes the tolerances between the flange and Ks remote are so that the flange rubs on the bottom of the thumb piece and causes friction with the return
ii) have you got the cable the right way around ... Have seen a few come in lately where the oem setup was ... Weird ... Just like gears the bud goes through the remote
iii) if it's a first generation lev ... You might be getting cable rub issues ... We can convert it FoC as long as you get it to us.

if in doubt email sales(at)pushie.com.au and we can work it out together. 02 9560 7841 ... Prefer to trouble shoot it over the phone and avoid aust post turn around times where possible.

what dropper remote best mates up with shimano cockpit?

My understanding is the reverb does not mate up well.
try a KS southpaw if you run 1x ... Otherwise the standard KGRL remote runs with or without shifters, left or right side.
 

Matty_moo85

Likes Bikes
Hey guys
Yep worked out the barrel adjuster, if I do tighten it the remotes slack comes up and it springs back but the post is activated the whole time. I am assuming this is because the cable is pulling the actuator. There does seem to be a fair bit of extra cable inside the frame because even moving it in or out from where it goes into the head tube it effects the way the post is working. I guess coming standard on the bike they don't really know how much post will be inserted into the seat tube so they make it longer. I think I might just have to try and re go over the whole installation and see if I can get it working.
Everything else on the remote/adjuster ect looks normal, also running the OEM clamp
 

bowtajzane

Likes Dirt
Al, internals no good for the Turner, so I've just got my hands on a dropzone which will
have to do until some one. .....................
makes a normal lev with offset. ...
Or I just Max out the master card on a new carbon frame with a longer top tube. ...
Also can you tell head office to write/draw up some decent fucking install instructions
especially for the remote, as you have said, you've seen some "different" ways to go about it....... end of rant. ..
 
Last edited:

Dales Cannon

lightbrain about 4pm
Staff member
Hey guys
Yep worked out the barrel adjuster, if I do tighten it the remotes slack comes up and it springs back but the post is activated the whole time. I am assuming this is because the cable is pulling the actuator. There does seem to be a fair bit of extra cable inside the frame because even moving it in or out from where it goes into the head tube it effects the way the post is working. I guess coming standard on the bike they don't really know how much post will be inserted into the seat tube so they make it longer. I think I might just have to try and re go over the whole installation and see if I can get it working.
Everything else on the remote/adjuster ect looks normal, also running the OEM clamp
I had the same thing to a lesser extent. Hard for the bike shop to guess exactly where the post will be. So I did a full reinstall. Instructions are on KS site. Easy to do. Mind you I probably cut mine 15mm too short trying to tidy up all the cables/hoses but no problem. Will get a southpaw one of these days anyway.
 

Rhys_

Likes Bikes and Dirt
During and after wet rides, the action of my KS Lev gets very slow and rough. I'm assuming this isn't normal?

If I clean and re-grease under the collar it eventually goes back to its normal self, but this still doesn't seem right.

Is there a seal or something of that nature that I can replace? It appears as if water and/or dirt is getting where it shouldn't be and causing dramas.
 

Nerf Herder

Wheel size expert
yeah ... grab some Slickoleum and give the stanchion above and below the seal collar a smear. Note other greases don't seem to address the problem as well as Slicko or Slick Honey (same thing)

If its never had a clean, I suggest its time to either send it in to us ($35 plus return shipping $13.90)* or learn how to open it up

Looks complicated, but the only real trick is being able to lock down the inner shaft of the cart so you can unscrew the pulley assembly off and separate the cart from the mast..
https://www.youtube.com/watch?v=SOYjhtPFZ4I.
A workstand will work in place of a vice ... but locking down that inner shaft is a real bugger if you dont have the tools or technique.

If you would like to email pushie, we have a brief " how to guide" on what to lube and what to pay attention too ... sales(at)pushie

My guide is once monthly or after wet rides, smear slicko onto the stanchion with the aim of getting in past the DU and coating the teflon ... its normally the teflon that dries and causes stiction of the post which then prematurely wears the cart. Ideally once quarterly break it down and clean & Lube ... but all comes down to how frequently you expose the post to terrential rain or submerge the puppy, along with how much preventative maintenance you've gotten in the habit of doing. I lube the stanchion once a month and haven't opened it up in a year and a half, but I rarely ride in the wet and rarely wet it when I wash the bike. wipe down is enough.

* there are a few stores and workshops that are getting good at servicing as well. BMCR in Adelaide, Ride in WorkShop in the Northern beaches of Sydney, FTR are getting there too, Bike ride in Hobart know whats what.

Anyway, feel free to email happy to nerd it up when time permits.
 

Rhys_

Likes Bikes and Dirt
Thanks Nerf, much appreciated. Looks easy enough so I should be right to pull it apart myself. I'll swing you guys an email for the extra info.

For the record it's been going strong for about 14 months with next to no maintenance, so no complaints
 

Rhys_

Likes Bikes and Dirt
Hey Nerf,

How do you guys go about not replacing the DU bushing every time you open up the post? Following the guide above..

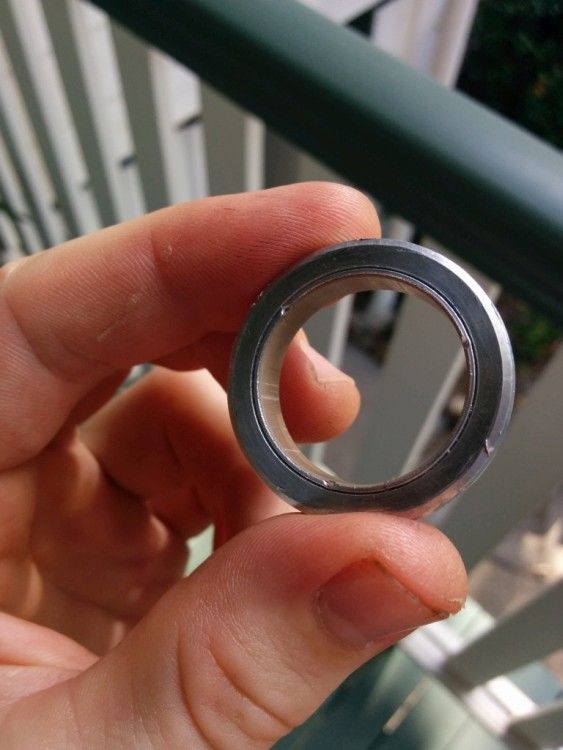
When you pull on the stanchion and use the upward force of the copper guides to pop out the DU bushing, the guides burr the bushing. They did in my case anyway. See picture below:


PS: you'll note the burrs are on the wrong side of the bushing, this is because inconsequentially, I had to remove the outer and the inner du bushing pieces separately (the telflon split ring came out by itself initially) and I pressed it back in the opposite way
 
Last edited:

Nerf Herder

Wheel size expert
Those are caused by the guide rods topping out at max extension. I think you will find that any material is pushed out or away from the stanchion ... But we feel around the Teflon when we "slicko and reinstall" to see if there is any sharp edges to contact the stanchion. More often then not the Teflon will be higher then the notch/burr

We do replace occasionally but it's more to do with how tight the fit is as opposed to concerns with scoring of the stanchion. Case by case obviously but I replace probably 1 in 30 ... Guessing

as you have repressed the du into the carrier ... The area to look at is the seam in the Du to make sure it isn't over lapped and more prone to scoring the stanchion. If in doubt replace it out ... we have loads in stock. It's common to have the carrier so wedged into the mast that the du pulls out of the carrier. I'd say 1 in 10 services we do.


Pushes straight back in if you have a wide enough vice ... I flip the du around like you do as well :)
 

Rhys_

Likes Bikes and Dirt
Great, thanks for that.

Looks like I was lucky enough to score the full shebang on KS dropper rebuild difficulty - post basically cemented into frame, actuator assembly exceptionally well attached to inner shaft, du bushing separation upon removal of cart, and a marginal-rooted DU bushing.

Turns out I did a pretty good job of pressing the du back into the carrier - there's basically no overlap at the join. I'm worried about the burrs/indentations though, as at least one of them doesn't have a teflon coating where it has deformed. Also, when I test fitted it on the stanchion, the bushing felt looser than I feel it should be/looser than I remembered it upon removal. I think seeing as it's such a cheap part I'll just grab a new one.

Do you guys put any slickoleum around the seating area for the du carrier in the shaft (the black outer the cart slides into)? I was thinking this would make it more likely to pop out as one piece during future rebuilds, but at the same time it needs to stay put and not pop out during normal use of the post
 

Boom King

downloaded a pic of moorey's bruised arse
Al, I've come by an unloved i900. Looks like vertical corrosion lines on the stantion, carrier in so tight I can't budge it.

Is it woth sending in or do I consign it to my MONA inspired modern artwork of munted mountain bike bits and plaster vaginas?

Cheers.
 

Nerf Herder

Wheel size expert
Great, thanks for that.

Looks like I was lucky enough to score the full shebang on KS dropper rebuild difficulty - post basically cemented into frame, actuator assembly exceptionally well attached to inner shaft, du bushing separation upon removal of cart, and a marginal-rooted DU bushing.
hee heee ... welcome to my world of neglected posts :)

Turns out I did a pretty good job of pressing the du back into the carrier - there's basically no overlap at the join. I'm worried about the burrs/indentations though, as at least one of them doesn't have a teflon coating where it has deformed. Also, when I test fitted it on the stanchion, the bushing felt looser than I feel it should be/looser than I remembered it upon removal. I think seeing as it's such a cheap part I'll just grab a new one.
Good Job mate :dance:
Loose isn't bad IMO for the DU, as long as its not audibly knocking (side to side) if you know what I mean ... rattling I guess is a better description ... but loose and free moving is better then tight and grabby

Do you guys put any slickoleum around the seating area for the du carrier in the shaft (the black outer the cart slides into)? I was thinking this would make it more likely to pop out as one piece during future rebuilds, but at the same time it needs to stay put and not pop out during normal use of the post
I try not to put too much under the DU / top of the rollers, but all depends how neglected the post has been. If we kinda know the rider isn't going to do any maintenance we tend to ladle slicko in there thick to try and get it to stick around for a bit and have a chance to layer on ... but there is a potential short term problem that this causes. If you put too much Slicko the DU + Slicko effectively makes the mast air tight and then you get something like negative compression on a fork ... at about the last inch of travel the air will start compression in the mast and push against the cart ... making it hard to get the last bit of travel and making the post bob in that last bit of travel.

The slicko will eventually thin and allow air to escape out of the mast again, but something to be mindful of. if it does this, just wipe some slicko out

in short though I think you are spot on with your thinking (note: I don't think the is any concern with the DU popping out during use provided the seal collar is On tight enough ... space is pretty limited in there I reckon which is why it gets compressed in the first place.

Good luck with the rebuild mate ... I think you are already speaking with Max at Pushie but any questions let us know

Al, I've come by an unloved i900. Looks like vertical corrosion lines on the stantion, carrier in so tight I can't budge it.

Is it woth sending in or do I consign it to my MONA inspired modern artwork of munted mountain bike bits and plaster vaginas?

Cheers.
lol ...

I can have a look ... on face value I can kinda guess the roller bearings will be OK, but is that is causing the corrosion marks on the stanchion

Depending on how adventurous you are and how bad the scoring is ... I wouldnt be scared to sand back any corrosion damage on the stanchion (normally the damage will be just above/below the seal collar at full extension). But you will need to religiously apply Slicko to the sanded areas ... if you ride in wet conditions, the relube routine will get ridiculous IMO ... but more importantly it will be your post ride drying and relube routine that will be a pain as you can't just leave it for several days without first having treated the unprotected area. Eventually the Slicko will penetrate the area and layer but this could take some time.

the good news is the i900/i950 / Dropzone / Supernaturals are really easy to take apart ... 10 to 15 min job in terms of preventative maintenance.

Anyway, maybe take some pics if you can separate the cartridge / DU from the mast and expose the bearings and internals ... I'm happy to give suggestions on here ... email is easier for me to discuss, but on here is fine if you want to treat it like a build thread thingy ... be good to see if we can get it back to functioning. If you need it more urgently then drop me an email and we can discuss options and pricing ... Al
 

Boom King

downloaded a pic of moorey's bruised arse
I'm yanking the crap out of the mast but the carrier isn't budging. Starting to see the vertical slots that the guide pins seat into. Do I just keep using more force?
 

Rhys_

Likes Bikes and Dirt
What I did to remove the carrier was to get some channel locks onto it, and use a forward and back motion (not twisting). Obviously you need to be very careful to not damage the stanchion or the collar threads in the process.

Cheers Nerf! You've been incredibly helpful. They are finicky little things
 
Top