
You are using an out of date browser. It may not display this or other websites correctly.
You should upgrade or use an alternative browser.
You should upgrade or use an alternative browser.
The Photo Snob Thread
- Thread starter brisneyland
- Start date

0 probably, Nikon supports all the mounts though functionality may suffer and full manual mode is needed. Canon as far as I am aware are generally not backwards compatible.
Chriso_29er
Eats Squid
I've just got an old Nikon D5200, been very happy with it. Next model up from base, think it cost me around $1200 new. 2nd hand you would get a great deal on the later versions of the same thing.
It's the lense that make the most difference, unless you start making the jump from crop sensors to full size sensors. But thats a whole new conversation.
Even though for a DSLR my camera is quite small, its still massive compared to mirrorless. I end up using a dedicated camera backpack that allows some additional items in it, which works well for my camera + 3 lense. And keeps it incogneto a bit!
Last edited:
beeb
Dr. Beebenson, PhD HA, ST, Offset (hons)
Err, nope. Canon have had the same mount and electrical contacts (the EF mount) since ~1987.0 probably, Nikon supports all the mounts though functionality may suffer and full manual mode is needed. Canon as far as I am aware are generally not backwards compatible.
The lens will mount on any new or newer EF mount Canon camera, and probably still work. The autofocus will feel very dated compared to more modern offerings though.
(Apologies for long post below)
In my opinion, the entry level D-SLR's are just okay, and that's it. Lenses are generally pretty soft optically (and often "scratchy" looking around the edges), they're harder to shoot in low light despite the good folk at the camera store talking to you about their "better low light performance" - they forget to tell new players that they'll also need a tripod to be able to use that "better" performance.
Basically, the cameras (particularly the sensor and software tech) are so good on modern smartphones that most people would probably be downgrading on picture quality and ease of use (not just ease of use, but speed of use) by changing to a entry level D-SLR.
Ease of use is a big deal too, and often overlooked ahead of the big trip - basically there's not much use trying to recreate the once in a lifetime/holiday spontaneous family moment you just missed while you were trying to get the "good" camera out of the bag, switched on, and probably adjust the settings from whatever you were shooting last (ie: Oops! Someone left the 10 second self timer on!). Realistically the only thing you gain from a basic D-SLR or mirrorless is optical zoom, and if the lenses aren't great you might come close or equal from cropping a higher resolution phone shot anyway. For the budget you could buy great quality older gear, but be prepared to carry around a house brick worth of weight to get it.
Don't get me wrong, you can get great results from D-SLRs and mirrorless cameras - but it generally takes longer to get those results and IMO that doesn't match all that well with a family holiday unless you're a hardcore photography addict and really want to carry the camera in hand for the whole trip to capture the spontenaeity.
For the budget you're looking at - I'd buy a tough camera - particularly if you're going anywhere with water. Because they can only ever have the lens they were fitted with from the factory - everything is optimised for that lens and sensor, meaning the pics will probably be a lot better than a basic D-SLR. plus it can be easily carried (hung off the wrist or stuck in a jacket pocket due to the smaller size), can withstand being dropped or bumped, and shoot underwater (model dependent obviously!). They're awesome if you're doing some snorkelling or worried you might get caught in a rainstorm while you're out on a walk.
Something like this is what I'm meaning (and still leaves some room in budget for a few spare betteries and some good high-speed memory cards which you might just buy online from B&H rather than getting stitched up by the local camera store selling you last years slower card models at a 100% markup...):
https://www.jbhifi.com.au/cameras/c...ic-dc-ft7-tough-camera-4k-video-black/695579/
I just reckon it's more likely everyone in the family will use something like that - rather than just "invisible dad" who's behind the camera in every photo, and you'll get a better variety of images, and not have to handle it with kid gloves or hide from the rain. Images will still be more than good enough to print sizes up to a couple of foot wide, probably more.
Thanks Beeb & chriso.
Good advice Beeb, you’re right that ease of use will be important. The weather sensitivity of the DSLR is a downer and agree that the bulkiness would limit its use.
I would like something with more zoom capabilities than the tough cam I think. Have a compact like that which is a few years old but my phone takes better images now ! I assume these new ones would be better but maybe not the step better that would drive us to use the camera instead of a phone ?
I was planning on getting missus to be the semi-pro rather than me ! She did a photography course 15 years ago so I reckon she’ll pick it up much quicker than me.
beeb
Dr. Beebenson, PhD HA, ST, Offset (hons)
(Long post again, sorry...)I would like something with more zoom capabilities than the tough cam I think.
Fair call, but then you end up with multiple lenses (or one that probably does almost everything badly, lol). I will say that particular model is a bit narrow on the wide end of the zoom (only 30mm "wide" on the 30-140mm zoom range in 35mm equiv) for inner-urban shots or "big sky" landscapes. I used a 24-105mm on a Canon 5D III (35mm sensor) for quite a while, and outside of doing wildlife or bird photography that was realistically enough for 99% of applications. Wide enough for landscape, and enough zoom to take a close-up portrait shot or pick out building details from the scenery.
One thing that's a bit counter intuitive that gets glossed over with D-SLR's is the bigger the sensor - the harder it is to get a sharp shot. This is due to the fact that the larger physically the sensor is the narrower the depth of field (depth of sharp focus) for a given aperture setting. It is also easier to capture the fact you might not have had steady hands while taking the pic, or if the camera thinks you were focusing on something other than what you intended. It's a large part of why phone cameras and compact cameras are so easy to use. They have large apertures which let in a lot of light, and physically small (but high pixel count) sensors that keep it all sharp. Generally most of the sales folk push the "bigger camera - bigger sensor - better photos!" (bigger profit margins too coincidentally!) and it is true if you have the time to nail every last detail to execute a clear sharp shot, but realistically for the casual user you often end up with a lot of photos that look great on the 2.5" display on the back of the camera, but don't hold up so well once you download them to your PC.
But D-SLR's and mirroless cameras can be amazing things, even though they do take some effort to get the best results (the magic green "A" for Auto doesn't know what you're actually trying to photograph and just tries to make a good exposure for example). Mount a Canon 15-85mm lens (with image stabilising and smooth "USM" focus motor) to any of the crop-sensor Canon bodies and with some batteries and cards added in you should be able to scrape in at the high end of the budget. The batteries will last ages and they are relatively simple and intuitive to shoot. The wife's old lens can be taken along if you do feel the need for more zoom (probably restricted to use in good light though otherwise it will be hard to get sharp shots without the image stabilising of the newer lens). If she's used a Canon in the past I'd advise against getting a Nikon as she probably won't want to use it. Speaking from experience - everything's backwards to a Canon user - even the direction of rotation to zoom! Messes with the muscle memory something fierce.
Fuji's X-series cameras are excellent little jiggers too for what it's worth, and early models like the XE-1 can be found quite cheaply at times. They eat batteries though - you'd need at least 3 for every one of Canon's D-SLR batteries.
Last edited:
slider_phil
Likes Bikes and Dirt
The newer Fuji's have a good WiFi app for transferring photos to your phone while you're away. I use it all the time. If you wanted something fairly compact then their x100 line is the go to, with a fixed 23mm lens. Otherwise the XE series is a nice compact setup and the kit lens (18-55mm) is extremely good. But the prime's are also well priced and extremely good glass.
I used to shoot canon and I haven't missed DSLRs at all since making the switch. Oh, and the battery life hasn't been as big of an issue as I thought. I regularly get around 500-600 shots on a single one, and they are so small it's easy to bring spares.
I used to shoot canon and I haven't missed DSLRs at all since making the switch. Oh, and the battery life hasn't been as big of an issue as I thought. I regularly get around 500-600 shots on a single one, and they are so small it's easy to bring spares.

slider_phil
Likes Bikes and Dirt
Thread needs more love. Here's one from last night's sunset on a local lake. My little Fujifilm X-Pro2 doing its job nicely. Will probably never go back to a full DSLR setup after being on mirrorless for the last couple of years.


stirk
Burner
Thread needs more love. Here's one from last night's sunset on a local lake. My little Fujifilm X-Pro2 doing its job nicely. Will probably never go back to a full DSLR setup after being on mirrorless for the last couple of years.
Really great photo, I'd love to be there at that moment.
slider_phil
Likes Bikes and Dirt
In all reality, it involved a couple of kids fighting each other, getting wet and a wife tucked back in the car because it was getting too cold for herReally great photo, I'd love to be there at that moment.

In all reality, it involved a couple of kids fighting each other, getting wet and a wife tucked back in the car because it was getting too cold for her
So it looks serene but the moment was far from that ...
Chriso_29er
Eats Squid
In all reality, it involved a couple of kids fighting each other, getting wet and a wife tucked back in the car because it was getting too cold for her
Sounds a lot like my photographic expeditions lol. Or actually just my life in general! ha ha
Calvin27
Eats Squid
In all reality, it involved a couple of kids fighting each other, getting wet and a wife tucked back in the car because it was getting too cold for her
I'm pretty sure the car is the standard hiding spot of photographer partners.
steve jobs' pancreas
Wheel size expert
.....the magic green "A" for Auto doesn't know what you're actually trying to photograph and just tries to make a good exposure for example....
I have an entry level Nikon (3300) with the standard lens, I know its not the best setup but I'd like to get the most out of it, what's the best way to break into manual mode and start understanding how best to use it ?
beeb
Dr. Beebenson, PhD HA, ST, Offset (hons)
Not sure what point you're starting from - so the most basic starting point is learn what Aperture, Exposure, and ISO are. For a 20 second run down:I have an entry level Nikon (3300) with the standard lens, I know its not the best setup but I'd like to get the most out of it, what's the best way to break into manual mode and start understanding how best to use it ?
Aperture is the name of the variable sized hole inside the lens. This can be used to control how much light reaches the sensor, and also how much "depth-of-field" ("DOF") you get, which refers to how much of the scene is in focus - ie: just a sliver, or everything in sight. Smaller f/ number means more light in, less DOF. Bigger DOF means less light in, but deeper DOF.
Exposure (time) is how long you leave the sensor exposed to the light. More time makes the photo brighter, less time darker.
ISO is a reference to how film sensitivities were measured, but is still basically true for digital. The lower the number, the less sensitive to light the sensor is, high the number the more sensitive.
Learning how these can be balanced in a practical sense is really key to anything other than Auto mode.
For getting away from Auto mode - I'm a big fan of Aperture Priority mode. This mode means you set an Aperture and ISO, and the camera decides the Exposure time. This gets you thinking about what aperture you want (ie: small f/ number for narrow DOF portraits, or mid to small f/ number for landscapes). It is worth going out specifically to take photos while you're adjusting to this mode though, as being honest you/I/whoever is probably going to balls a lot of them up while getting adjusted to things. This is because you still need to be somewhat mindful of keeping an eye on ISO setting and camera-selected Exposure times. For example, if shooting deep DOF landscapes, with low ISO - the camera's going to set itself a long Exposure time. That's fine if you're working on a tripod to keep the camera stable, but not great if you're trying to shoot a 5 second exposures hand held, or try and take a quick snap of the missus, kid, pet dog, whatever while forgetting you've left it on Aperture Priority and end up with a 15 second impromptu "modern artwork". Basically just experiment a lot, keep an eye on roughly what shutter speeds (Exposure) the camera is setting, and you'll get a feel for what you can shoot hand held, and what you need a tripod for. Then you start to get a feel for when you need to raise ISO to keep Exposure hand-holdable, or to sacrifice a little DOF and open the aperture up to let more light in. If you shoot around sunset and roll through dusk, you'll realise just how quickly exposure requirements can change, and how quickly you can end up needing a tripod. If you do get or have a tripod, longer exposures can be your friend if you like the smooth water style photos, or light-trails. But work on the basics, be prepared to stuff up a lot, and keep on trying until you get your head around it.
One thing no-one told me until quite a while into when I had been shooting, was about "stops". The name itself is irrelevant, but what it refers to is the "square rule" of light, which basically refers to exposures following an exponential curve. For each time you want to double the brightness of your image, you have to double either the exposure time or ISO sensitivity, or open your Aperture a "full stop". Most modern cameras have all the 'exposure triangle' settings (Aperture, Exposure and ISO) divided into third-"stops". What I didn't know until later, was that meant if shooting manual - if you already have a perfectly exposed shot - but want to make the Exposure time longer for example, for each adjustment 'click' to Exposure, you need to balance it by either going one 'click' less sensitive on ISO or closing the aperture one 'click'. So if you want 5sec @ f/4.0, ISO200 to become a 10sec exposure (3-clicks from 5sec generally being 6sec, 8sec, 10sec) - you could use either 10sec @ f/5.6, ISO200, (3-clicks from f/4 through f/4.5, f/5, f/5.6) or 10sec @ f/4.0 ISO100 (3-clicks from ISO200, through ISO160, ISO125, ISO100).
While this quite possibly all sounds massively complex and difficult - once you work out what they actually do in a real world sense, and tinker round with it a bit - it's fairly straight forward.
Some random examples from my archives:
Shallow DOF:

Small Scale
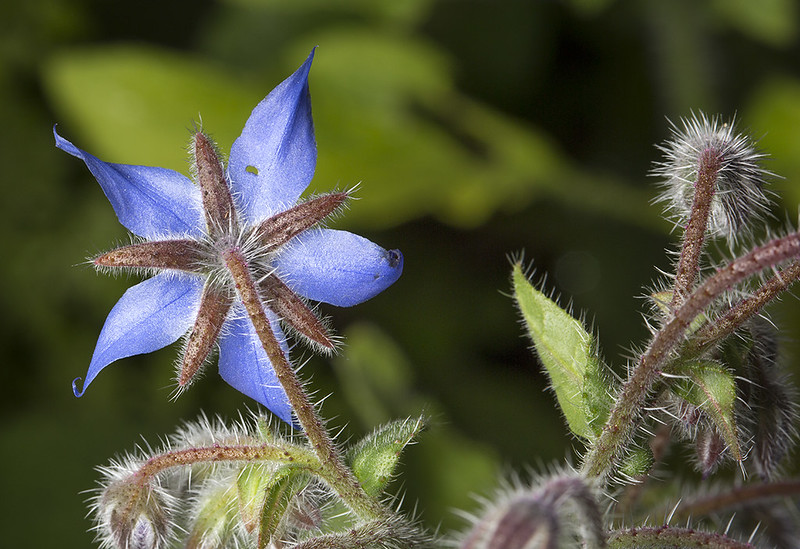
Borage Flower
Deep DOF:
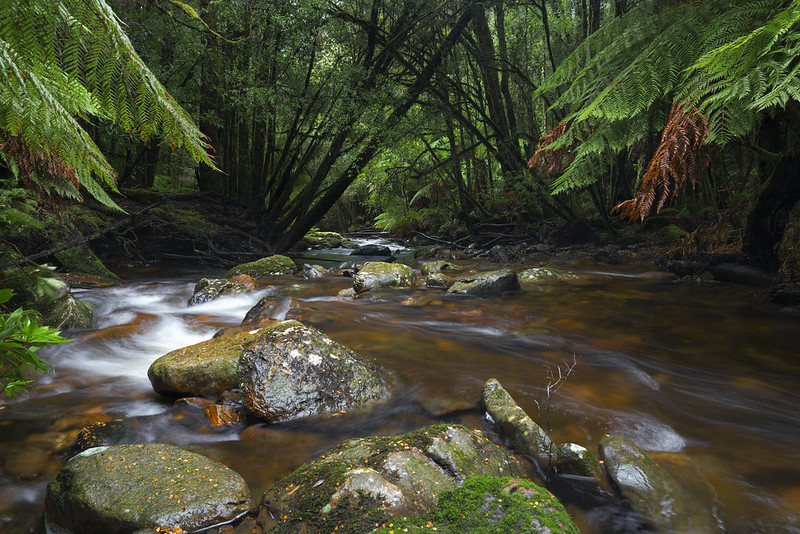
Tasmania, 2018
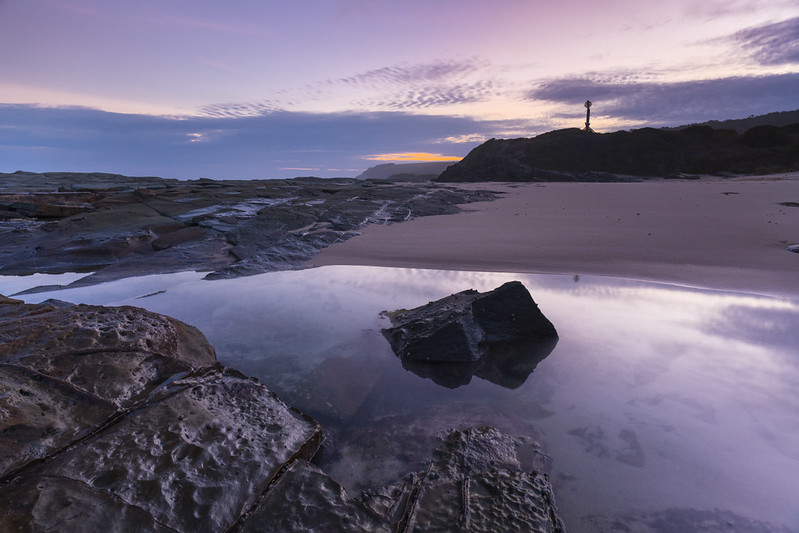
Anchored
Long Exposure:
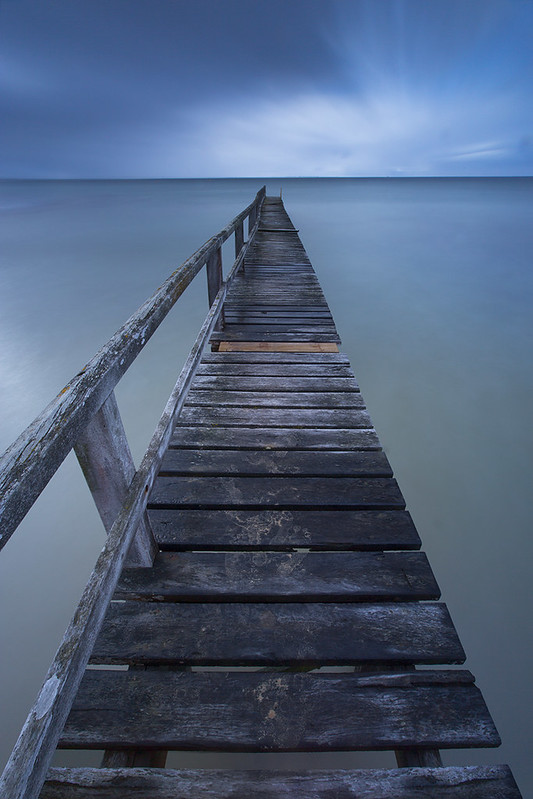
Portsea Piers
Long Exposure (with star trails):
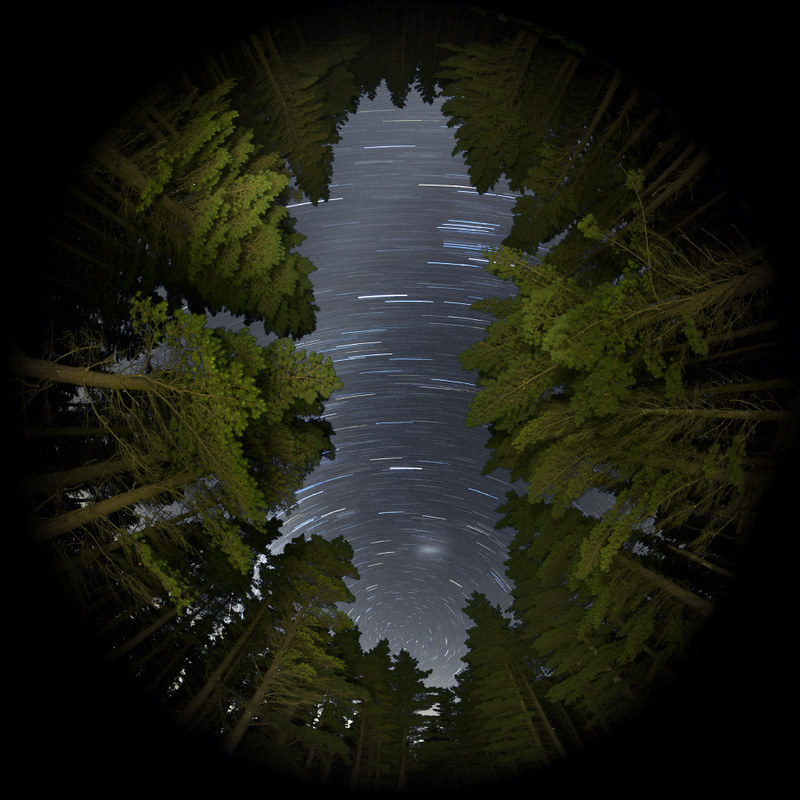
Celestial Canopy
Hopefully that's some use anyway and not overly-confusing. If there's anything in particular you're struggling with, let me know.

Calvin27
Eats Squid
I have an entry level Nikon (3300) with the standard lens, I know its not the best setup but I'd like to get the most out of it, what's the best way to break into manual mode and start understanding how best to use it ?
What the guy above said. Basically you need to learn the exposure triangle.
https://photographylife.com/what-is-exposure-triangle
Short version:
- Apeture: Big numbers means smaller hole = less light. Smaller numbers means blurry background and less stuff in focus, vice versa
- Shutter speed: higher numbers means faster 'snap' - this means less light but less chance of moving stuff blurring (i.e. you can shoot a hummingbird). Also similar, but different is camera shake where higher shutter speed is better - image stabilization can help here. Opposite applies.
- ISO: generally higher is more grainy.
Cardy George
Piercing rural members since 1981
@steve jobs' pancreas I've got a D3100 that has a auto-ISO function, which helps take some of the guess work out of using aperture priority. Doesn't work when the flash is on though.
The way I taught my self was by setting up a scene, then taking a boat load of images working my way thru each variable to get an idea of what effect each function created.
The way I taught my self was by setting up a scene, then taking a boat load of images working my way thru each variable to get an idea of what effect each function created.